29 June 2008

JCC Finished

I've sent in my entry. That's it. I'm done. Finished! And what an amazing accomplishment it's been for me, too! Because I've got a stress fracture in my clavicle, I had to call it without doing the dress. I'm a little bummed about that. My capsule is still great, however, and I've done more sewing this month than I have in YEARS! Since the rules of the contest allowed one item to be purchased, I finished up my capsule with a skirt I bought to fit into my Limeade wardrobe.

Limeade

A capsule that is all about staying cool in temperatures that are over 110F. The vintage style camisole with hand crocheted lace and lime ribbon accents compliments the cool shorts in both white and a lime print. A purchased skirt can take this capsule out to dinner, or the desk deli bag can carry lunch on the go, complete with pockets for utensils and even some blue ice.

Patterns and other Info:

  • White Camisole: I began the camisole before June, having cut out the handkerchiefs it is made from, and started crocheting the trim. I did all the sewing, and 90% of the crocheting in June. The pattern is from a vintage magazine article which I read at this website.
  • Patterned Skirt: The skirt was purchased.
  • Both Shorts: McCalls 5010, View C.
  • Desk Deli Bag: Pattern is the Desk Deli by Quilts Illustrated

June CapsuleOutfit 3Outfit 2Outfit 1

27 June 2008

Desk Deli

The Desk Deli, by Quilts Illustrated is designed to be a lunch bag, complete with interior pockets perfectly sized for utensils, blue ice, and anything else one might want to carry with their lunch. I loved this bag pattern when I saw it at the quilt store, and I knew I had to have it. They were sold out, so I even had to wait for them to order more of them! Since time is fast ticking away, I decided to change my accessory from the sun hat, to this bag. For one thing, I think it will sew up faster, for another thing, this pattern has been burning a whole in my brain ever since I bought it. After making the shorts, I had some of the green cherry blossoms fabric left over, and I decided to take a chance that I wouldn't use up too much of the love is fabric, because I wanted to make my bag out of those two fabrics.

Finished Bag
Inner Pockets

I must say, I had a blast making this bag! The pattern is great, the bag is the cutest thing ever. It was my first time using fusible fleece, and I loved the stuff! Such a great way to construct a bag. I want to make one for everyone I know! LOL! And since pictures tell the best stories, here it is.

25 June 2008

Green Shorts

Shorts

The second pair of shorts worked up even better than the first. I was using better quality cotton, for starters. I did make a few changes to the construction. Nothing major. Instead of sewing the ties in half, then turning them right side out, I folded them like double fold bias tape, and stitched them that way. No turning involved. I made sure it was going to end up being the same width when I was finished, and it was. I also did a top stitch along the top of the shorts. It just looks cleaner that way. These shorts are perfect for what I wanted, light, loose, and cotton. Ideal for the 115°F [46°C] weather we've been having so much of this summer.

I love the print. It's the cherry blossoms I bought at the quilt store. Their fabric is so supple and the weave is even and dense. Love their cottons! They make great shorts, too!

Shorts

Shorts

The shorts are done. Nice and quick, just like I expected. I was pretty sure that I was making a tent, but it turns out that they fit quite nicely. I even managed to avoid getting sucked in by the error in the pattern directions. I've got a second pair of shorts already cut out, so I'll probably whip them up, too.

24 June 2008

Camisole Done

I finished ribboning my camisole. It's all done and pretty!

Camisole Strap Detail
Camisole

23 June 2008

Lace Pattern

Crocheted Beading Edge (with holes for ribbons)

Chain 10.
Foundation Row: SC in 2nd ch fr hook and every ch to end, ch 3, turn.
Next Row: HDC in 2nd SC fr end *(ch 1, sk 1 SC, HDC in next SC) 3 times, ch 5, turn.
Row #1: HDC in 5th ch fr hook *(ch 1, HDC in sp below) 4 times, ch 3, turn.
Row #2: *(HDC, ch 1) 3 times, HDC, ch 3, turn.
Row #3: HDC in 1st sp, ch 3 (sk 1 sp) HDC ch 1 HDC in last sp, ch 3, turn. [3 sps total, large sp is for ribbon].
Row #4: HDC, ch 1 *(HDC, ch 1) 2 times in 3 ch sp below, HDC in last sp, ch 5, turn.

Repeat Row 1-4 to desired length. (Before tying off, see To Join Lace Edgings.)

To Join Lace Edgings: Cut 12" [45cm] tail at end of work, and pull through loop. After sewing in place, sl st chained edge to last completed row, pull through loop, thread 1" [2cm] back along edge and clip.

Source: Folkwear Patterns, Edwardian Underthings.

Not much time left

Only a week left, and I'm still working on my first piece for the JCC. Granted, it was terribly time consuming. Still, I may have to completely change my pieces, in order to finish on time. Maybe I'll substitute a second pair of shorts for the dress, or something. One more week. Wonder how much I can get done this final week?

21 June 2008

Finished Lace

I finished the lace. Finally! At last! It's the wee hours of the morning, but I was so close I had to stay up late to finish the lace. Much as I'd like to finish this camisole, and sew the lace on, I figure it's much wiser to wait until I've slept. Making a mistake while sewing the lace on the camisole would not make me happy, at this point. I've spent a shocking number of hours crocheting that lace. But it's beautiful, and I've gotten really good at the pattern!

I did try to put the camisole aside, and work on the shorts, so I could get some speedier progress, but my camisole just refused to let me. It whispered in my ear, insisting that it be finished first. I'm really wishing that it fit better, because I've put so much work into it! It will be lovely, nonetheless. I did get my shorts cut out, so those will sew up very quickly. I'm pretty much guaranteed two items finished by the end of the weekend. Then I get to decide if I stick with the plan or change it to something I can finish in the remaining week. I'm looking forward to making faster progress. If I realized how much lace I was going to have to crochet before I started the camisole I would not have included it in the capsule. Of course, then I probably wouldn't have ever sewn the camisole, either.

15 June 2008

Slow Progress

Crocheted Edging

Progress is slow on the camisole. I've crocheted 26 of the 120 inches of lace I still need. That's a lot of lace!

Half-way through June and I should be half-way through my items, but that is not how it is working out. I still have hope that if I can devote the better part of the next two weeks to sewing, I will still be able to finish. That's a seriously tight schedule to make, though. Five items in ten days? I think I just gave myself an axiety attack!

08 June 2008

First of the Lace Edgings

I got the shoulder straps all worked out and attached! That step of the garment has had me slowed down for almost a week now, so I'm quite glad I'm over that part! Now it's all smooth sailing with this camisole. I even finished the first length of the crocheted edging, and got it attached to the bottom of the camisole. Now that my shoulder straps are at the proper length, and attached, I was able to measure the neckline, and the arm holes so I know the lengths I need to crochet for more lace.

Edging Attached

05 June 2008

More Camisole

I have been stymied on this camisole. I realized there were going to be fitting issues, and fussing issues, and such with the sides and shoulder straps, so once I got to that point, I pretty much stalled out. For days. This is where the good part of this contest kicks in. I can't delay too terribly long, or I'm not going to make my deadline! So today, despite a late hour, I pushed through and forced myself to fiddle with those frackin' shoulder straps.

First Fitting

I discovered quite a few things about this pattern, not the least of which is that I didn't follow directions very well. Granted, this pattern is about as clear as mud. I thought the paragraph in question was for the second method, not the first. I'll adapt. It isn't a critical issue, at least. The pattern doesn't seem to address arm holes at all. Probably because the writer never expected an overweight person to make this thing, so needing wider sides, and a deeper arm hole probably never occurred to them. I have chosen to solve the issue with a judicious use of scissors. There is one issue with the garment I will not be able to fix, and would not have been able to avoid even if I'd known in advance, and that is how wide the shoulder straps are set. If I make this camisole again I will add fabric to the sides so that the shoulder straps don't have to be so far to the outside. In which instance, I'll need four handkerchiefs, instead of three. And more insertion lace. Wow does this thing burn through the insertion lace! I really did use the full eight yards! But it is quite lovely, and it will indeed fit, so I'm pretty excited about that.

Attaching the Lace Straps

I am currently attaching those shoulder straps with hand sewing. It was the only way to keep the join of four different angles of lace looking pretty. I'm doing my best to hide my stiches into the lace pattern itself. Pretty wins over durable. After all, with a camisole this lacy and pretty, those straps aren't going to be under that much stress.

With five pieces to sew, I have set myself a personal goal of getting each piece done in six days. That only leaves me two more to finish this camisole, and she's got a lot of work left to do! Then again, I always knew I might need to set it aside before finishing, since I'm going to need to crochet more lace. Lots more lace.

02 June 2008

Beginning the Camisole

Materials

I had started this little camisole last year. I loved the concept, bought all the goods, and even started crocheting the lace edging for it. Never finished it. This piece was the first thing I thought of for my capsule, and I was so glad that one item could be made before June, because I'd have felt like I was cheating since I had already cut it out, and had crocheted about half the lace already. (Ok, I thought I had crocheted ALL the lace already, but I was way, way off on that estimate.) Because of the unusual construction of this camisole, I really had no way of knowing if it would even remotely fit me, so I decided to go ahead and sew it now. This way, if it doesn't fit me, I haven't lost time in June, and I can come up with another top for my capsule. Perfect, right?

Beginning Pieces

Enough of the intro, get to sewing already! This camisole is a handerchief cami. Literally. You take three handkerchiefs and cut them into triangles. You sew insertion lace everywhere imaginable, edge it with lace that you can run a ribbon through, and voila, an amazingly pretty camisole. I found the pattern online when I was researching Edwardian undergarments. I really love the super lacy loveliness of Edwardian camisoles, and I originally wanted to make it as part of a costume for a convention I was scheduled to go to. When the trip was cancelled, I stopped working on the camisole.

Stitched on Lace

It took me a while to figure out what I was supposed to do with all that insertion lace. The diagram isn't terribly clear, and I was getting confused between what was supposed to be insertion lace, and what was supposed to be my edging lace. I decided that the diagram only shows the insertion lace, and it's pretty much everywhere, with the edging lace going on last, and not shown in the diagram. I've never worked with insertion lace before, though the stuff I bought handles more like eyelet than lace, so maybe it still doesn't count.

Edged in Lace

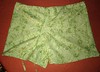
I am surprised with how pretty it is turning out to be. Since I used rather plain men's handkerchiefs, and I chose a fairly substantial lace insertion, I thought it might miss pretty by a few points, but all that lace really does pay off. It's downright lovely.

Front Assembled

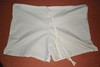
The pattern calls for the insertion lace of the front and back diagonals to be cut all in one, but I just could not manage to figure out how long my shoulder straps were going to need to be. So I am going to add them at the end, after the front and back are solid pieces. I would have had to miter the insertion lace at the corner between neckline and shoulder anyway, and it will be easier for me to figure out what the heck is going on with the side seams, and make sure my armpit depth is adequate. So today I added all the lace, to most the edges that call for it. Tomorrow I'll fiddle with those shoulder straps and side seams to see if I can figure out what is going on. Not terribly easy when the garment has as much fullness as it does, and is destined to be gathered by the ribbon lace edging.